[ad_1]
My sport-scale 1/5-scale Sopwith Triplane has a somewhat skinny wing (although it’s thicker than scale at 1 inch on the aileron servo). A low-profile servo, resembling Airtronics 94921 or Hitec 77BB, would match with the shaft vertical, however I had normal ones available, so I went with them. I made an 1/8-inch-thick and a couple of 7/8-inch-wide plywood plate to suit between the ribs on the servo location and a couple of 1/2 inches lengthy to go between the primary spar and aileron spar. I glued a 3/8-inch-wide strip of 1/4-inch-thick plywood to the within of the ribs in order that I might mount the plate. Use a bit of scrap out of 1/8-inch-thick plywood as a information to inset the mounts in order that the servo plate is flush with the skin floor of the wing. Place the servo on the plate, and mark the place the output arm will protrude. Preserve the skin fringe of the slot 1/2 inch in from the sting of the plate in order that nothing will intervene when the plate is in place on the mounting strip. Drill 1/4-inch-diameter holes at every finish of the slot, and minimize between the holes with a hand-coping noticed or energy jigsaw. The Dremel jigsaw that I’ve had for years works effectively.
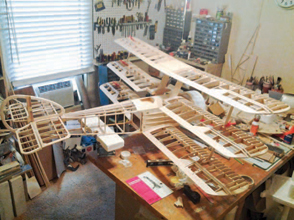
Constructing the Sopwith Triplane means that you’ve six aileron installations. I set up my two aileron servos within the backside wing after which drive the 4 others about them with slave rods. Conserving the servos within the backside wing eliminates having to run servo leads up the cabane struts to the highest wing.
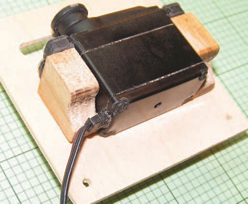
You’ll be able to mount the servos to the plates with aluminum angle or 3/8-inch-thick hardwood blocks. As a result of I all the time have maple available and a small, 8-inch-diameter-blade desk noticed, I made up some wooden blocks as proven within the picture. Drill a 1/8-inch pilot gap and a 1/2-inch-diameter gap at one fringe of the strip. The pilot gap makes it simpler to drill from either side, decreasing the splintered breakout. Wrap the servo with three layers of masking tape to create an area across the servo after it has been mounted.
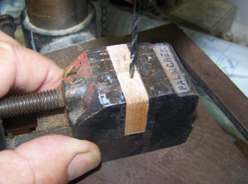
Place the servo and mounting blocks on a flat floor, and maintain them in place. Spot switch the servo holes to the blocks. I’ve made a easy device for doing this, and it really works each time. It’s merely a 3/32-inch-diameter drill inside a bit of 1/8-inch-outside-diameter brass tube. Reduce the tube 1/8 inch shorter than the drill. Insert the slicing tip of the drill 1/2 inch into the tube. Coat the uncovered drill with 5-minute epoxy, and push it by the tube till 3/32 inch of the tip is uncovered (it ought to be freed from epoxy). Let it remedy.
The 1/8-inch tube received’t match by a servo-mount eyelet, so its diameter should be decreased. Place the drill/tube meeting in an electrical drill, and with it operating, use a file to scale back the skin diameter till it would match by the eyelet. I take advantage of a 3/32-inch-diameter drill for a no. 4-40 faucet. It is a little smaller than the 0.099 inch my drill index requires, nevertheless it creates a deeper thread within the wooden.
Take the tape off the servo, and assemble the blocks to the servos. For ailerons, be sure you make a proper and left; the flaps would be the similar.
AILERONS 101
I bear in mind again within the early days of RC when aileron servos (or ought to I say “servo!”?) had been mounted within the heart of the wing. Two pushrods operated strip ailerons, or they went to the outer-wing panels to a bellcrank and pushrod to barn-door ailerons. This was just about the usual set up. With bigger fashions and comparatively cheap servos, a servo on every management floor is now frequent. It is a higher system, providing a number of benefits. The obvious is redundancy: If one servo fails, apart from driving onerous to 1 facet, you’ve a superb probability of retaining management. One other necessary benefit is that, through the use of two channels, one on every aileron servo, you’ll be able to arrange exact centering and journey.
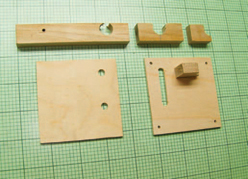
Listed below are the elements you want: the mounting rails, servo attachment blocks, and hatch covers. The duvet to the left has two holes in it forming the ends of the slots. Take away the fabric between the holes, and sand it clean.
With the blocks connected to the servo with double-sided tape, I calmly press into the blocks with the drill bit that’s centered within the grommet with the brass tube.
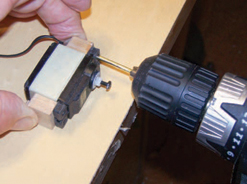
Use a size of brass tube and a drill bit, as proven, to precisely mark the place of the screw holes on the mounting blocks.
For correct gap alignment, I end drilling out the holes utilizing my drill press, with the blocks held in a vise.

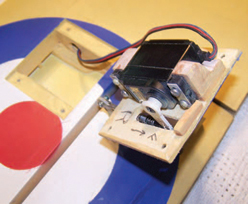
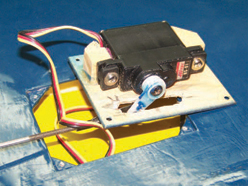
Right here is the completed servo set up on the hatch cowl. The blocks are glued to the hatch with Z-Poxy in order that the servo arm is centered within the slot.
Right here the hatch cowl is in place in my Sopwith Triplane wing.
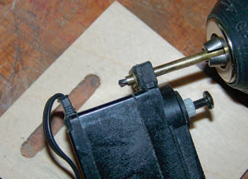
Discover the notch within the block. This permits the servo result in clear the block with out interference.
With the hatch cowl eliminated, you’ll be able to see the attachment rails, that are glued to the wing ribs.
There may be one other necessary cause for utilizing two channels, and that’s to permit simple setup for differential ailerons. I really feel that this is applicable to coach, sport, and particularly scale fashions. I’m stunned by what number of modelers aren’t conscious of the significance of differential aileron journey, the place the journey of the upward-moving aileron is greater than the downward-moving aileron. The downward aileron will trigger extra drag on the fallacious wing (outdoors the flip), inflicting adversarial yaw. Beginning with 50% right down to full up will robotically enable for yaw within the correct route, making scalelike, coordinated turns. Don’t be afraid to scale back it much more. As little as 30% down shouldn’t be unreasonable. Coupling some rudder in a flip provides to the realism. For those who don’t robotically enter rudder in a flip (some pilots do, however most don’t), then let your transmitter apply it. Most late-model transmitters have aileron-to-rudder coupling. Begin with about 20%.
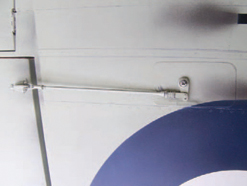
An schooling in differential ailerons got here my method just a few years in the past when my good associates Bob Walker (of Robart fame) and Invoice Samson determined to enlarge my scale 72-inch-span Windex 1200C powered glider to 96 inches and add ailerons. I printed the 72-inch model in Mannequin Airplane Information (plan X0801A) within the August 2001 situation. With no ailerons and powered by a Pace 400, it flew nice. Invoice completed his and actually didn’t like the best way it flew; it simply wasn’t what he anticipated. Bob was into another tasks on the time, so gave his framed-up Windex to me to complete. The underside line is that I completed it and wasn’t very pleased with it, both. It was good in pitch, truthful in yaw and rudder, and by no means good in roll. I elevated the dihedral just a little, and that made the rudder management higher. Some differential was in place after I put in the offset servo arms and management horns, however this was too little for the lengthy, high-aspect-ratio wing. As a result of I used to be utilizing a 4-channel radio and couldn’t electronically improve the differential, I elevated the offset within the controls (rather a lot) to present me 7/16 inch up and 1/8 inch down. This, plus a 25% aileron-to-rudder combine, made the Windex a nice mannequin to fly. Management-surface adjusting pays off!
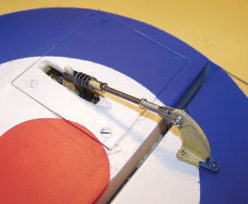
Right here is the aileron servo set up in my Windex glider. The servo is smaller than on the Sopwith Triplane, however the approach is identical.
The identical association is utilized in my large Spitfire fighter. Mounting the servos internally additionally cleans up the look of your fashions.
The enlarged Windex has Hitec HS-81 normal microservos on the ailerons. Just below 1/2 inch thick, they only match into the simply over 1/2-inch-high space on the servo location. The servos are screwed to a few small maple blocks epoxied to the 1/16-inch-thick plywood cowl. If I used to be doing this once more for this software, I’d glue the servo to the plywood cowl with Pacer Zap Goo as a result of the vibration stage is so low. Wrap the servo with a layer of masking tape to make cleanup simpler whether it is eliminated. The Zap Goo will maintain the servo securely in place. I wouldn’t do that with something however a small electrical or electric-powered glider mannequin.
Most of my giant-scale fashions have wings which are thick sufficient to mount the servos with the output shaft vertical, and this makes servo and control-arm entry simple. In fact, the arm and pushrod are uncovered and could be a static rating downgrade in competitors!
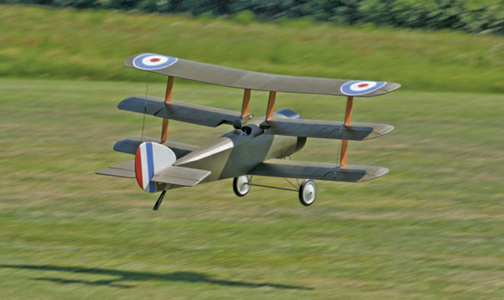
Right here is the Sopwith Camel on its first check flight. It performs effectively and is ready up with differential aileron management response to counter adversarial yaw.
By Nick Ziroli Sr.
[ad_2]
