[ad_1]
We are Jess and Shawn, and we travel full-time in our self-converted van. Over the past few years, we have assisted others with their DIY van builds. Our top recommendation for anyone looking to create their own mobile home is to prioritize planning—plan meticulously and continue to plan. This means taking the time to research and educate yourself. If you’re not familiar with basic electronics, we suggest starting with a helpful video we’ve discovered that simplifies these concepts: Electricity Explained: Volts, Amps, Watts, Fuse Sizing, Wire Gauge, AC/DC, Solar Power, and More! Understanding your electrical needs is crucial, as this can significantly impact your experience on the road. For a deeper understanding, you can refer to our other article titled “Campervan Electrical System Explained.”
To simplify, we can break it down into three key categories:
What do I need for a DIY electrical system in a van?
What products should I purchase for my electrical system in a van?
Where should I install the electrical system in the van?
What do I need for a DIY electrical system in a van?
Determining your requirements hinges on your power needs. Consider the devices you plan to use, how frequently you will use them, and the duration of each usage. This encompasses everything from a refrigerator running continuously to an electric toothbrush charger that you may need only occasionally. It’s beneficial to gather all your devices and review their power consumption, which you can find on their labels. We also recommend a highly informative YouTube video that explains this process and provides a free downloadable spreadsheet to assist with calculations: How Much Solar Power Do I Need for My Camper? | How to Calculate Camper Solar System Size. This will allow you to assess the required size of your battery bank, inverter, and solar array.
Once you have a clear understanding of the system size needed to comfortably operate all your devices, you can begin purchasing components. If your requirements exceed a 3,000-watt inverter, it might be worthwhile to explore a 24 or 48-volt DC electrical system; while these systems entail a few additional components, they can reduce the necessary wire sizes, which we will cover later.
What products should I buy for my electrical system in a van?
With an understanding of your power needs, you are now ready to consider your purchases. Depending on your specific requirements, you might find several brands that offer compatible products. You are not obligated to use the same brand for every component, but opting for a single manufacturer can simplify communication between devices.
“What components do I need to purchase?” The fundamental components required for your power system include a battery bank, an inverter, a solar array, a solar charge controller, positive and negative bus bars, a DC to DC converter, a shunt, wires, terminals, and lugs. Some shunts include a mountable display to monitor your battery levels, while others may provide Bluetooth connectivity to smartphone apps or offer both options.
Consider adding shore power charging capability for situations when you park at campgrounds or friends’ houses. This feature enables you to connect to the grid, which is particularly useful for charging or operating larger appliances like air conditioning units when you are stationary for an extended period. Shore power connections can be established using a separate AC to DC converter or a combination inverter charger such as the Victron MultiPlus or Renogy Inverter Charger. Each component will also require an input and output fuse or circuit breaker, a 12V fuse box, and breakers for your AC electrical outlets. You can find RV fuse panels that integrate both functionalities into one unit. Additionally, incorporating a master shut-off switch like this one allows you to completely disconnect your battery output for maintenance and storage.
Before you Buy: What to Consider
One important factor to consider is the accessibility of customer service for the brands you choose. Based on our four-year experience living in our van, we can attest to the value of responsive customer service. There will inevitably be moments when you need to reach out for troubleshooting or to utilize a warranty replacement. For first-time electrical systems, we highly recommend opting for a company like Renogy for your primary components. They offer high-quality products and excellent customer support, along with readily available online manuals. Other all-in-one unit brands with commendable customer service include GoalZero and RichSolar. We have successfully used brands like Renogy and Redodo for batteries, which can be ordered directly from their websites or through online retailers like Amazon.
You will also need to procure correct wiring for connecting all these components. Using wires of inappropriate size can not only impair performance or cause component failure but also pose fire risks if the wire gauge is too small. Always adhere to the manufacturer’s guidelines that come with each component or are available for download online. Look for schematics pertaining to your setup, indicating the recommended wire gauge and fuse size for each component. For instance, conducting a simple Google search for “victron multiplus wiring diagram” can provide helpful visual references.
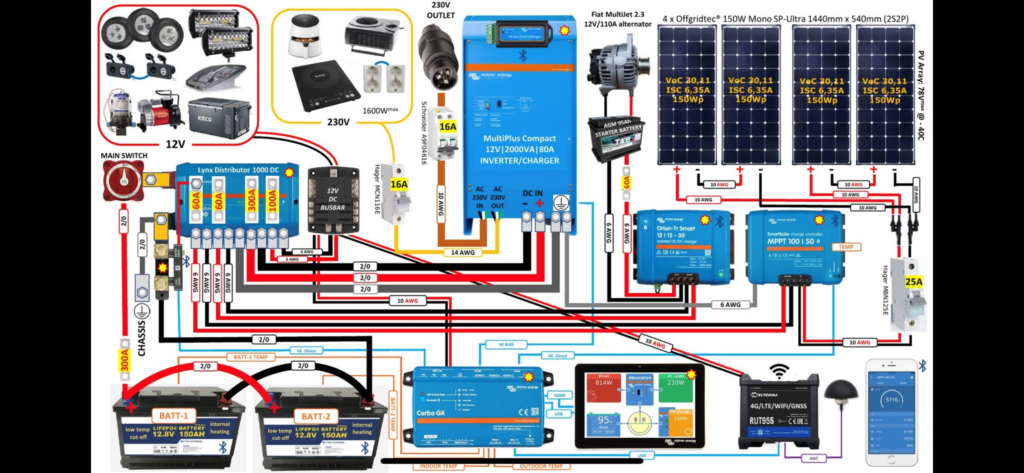
You can refine your Google search to target the specific components you are using. If you encounter difficulty finding a suitable diagram, yet feel confident in your grasp of electrical basics, referring to a wire size chart might also be beneficial. Numerous charts are available that illustrate wiring recommendations based on component draw and connection distances.
Choosing the Correct Wire Size for a DC Circuit – Blue Sea Systems
For example, if a fan pulls a maximum of 10 amps and is located 10 feet from the fuse panel, this chart suggests using 16 or 14 gauge wire based on the specific component. Consider oversizing the wire if necessary to avoid purchasing multiple spools for different components. We typically use 12 gauge wire throughout our builds to accommodate most components.
A piece of advice: when purchasing smaller gauge wire, opting for tinned or copper-clad options can be a cost-effective choice. However, for larger wires (10 gauge or thicker), it’s advisable to invest in pure copper, as it can handle higher current loads. Avoid solid core wire; instead, select stranded wire for vehicle builds because it can navigate the curves of the van’s structure more easily and tolerates vibrations better.
Where should I put the electrical system in the van?
The initial step in your build will typically involve the electrical and wiring setups. From the outset, determine where you will install outlets, fans, lights, switches, and displays to appropriately route the wiring. Knowing the distance from each component to the fuse box will assist in selecting the correct wire size. A useful method is to use a Sharpie to outline on the inside of the walls where each element will be placed as you plan. We also recommend using adhesive zip tie holders to secure the wires, alongside painter’s tape to label them for organization.
Tip: To avoid the risk of accidentally drilling through a wire when attaching wall or ceiling panels, refrain from routing wires through the metal ribs.
Designing your Electrical System Around Your Van Layout
When designing your layout, ensure there is sufficient space for your electrical components. Some parts can be affixed sideways while others cannot. Confirm that there is adequate ventilation for each component and that no objects will obstruct or come into contact with the wiring, which could potentially result in loose connections. Positioning your system centrally may help minimize the lengths of wire required. Be mindful of other installations, such as water fills, sinks, water tanks, showers, and heaters, and their proximity to your electrical components in case of leaks. Another crucial consideration is to ensure that the system is on the same side as your factory battery for seamless DC to DC connections.
Final Considerations
Planning a van build, particularly the electrical components, is quite intricate. Take the necessary time to research, strategize, and execute this phase of your project. Rushing through could lead to mistakes. Evaluate your power requirements to determine what to purchase and where to position each element logically within your design. Keep everything organized and accessible for troubleshooting or adjustments. It’s also advisable to enhance your knowledge to effectively address issues if they arise. If uncertainties persist, consider hiring a professional for assistance; this will not only resolve your immediate concerns but will also provide valuable insights for future projects.
More electrical and van build resources:
Installing Solar 101
What you need to know about solar panels
RV Electrical for Beginners
.
[ad_2]
